Navigate to Webtoffee Import Export and click on Export

From this window, you can export or download users/customers from your WordPress website/WooCommerce store.

Choose user/Customer from the drop-down and click Select an Export Method.
Here you have three options available for export. Quick export and Advanced export.
The below sections will explain how each of the export is done.
Quick Export
With the Quick Export option, you can only export the basic/standard fields of the respective post type. You do not get to selectively filter the columns with this option.
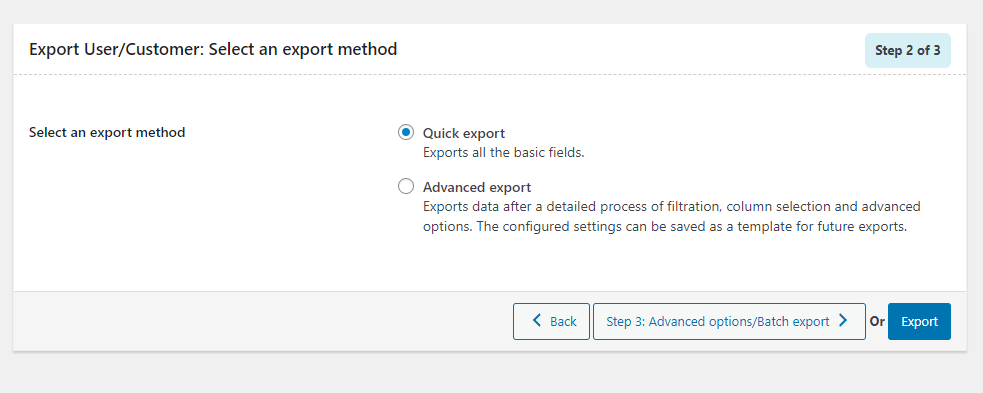
Now you can either click the Export button to start the Export or go to the Advanced options/Batch export window to enable batch export of users.

Export in batches of – Here you can give the number of records that the server will process for every iteration within the configured timeout interval. If the export fails you can lower this number accordingly and try again. Defaulted to 0 records.
Once you complete the configurations click the Export button.
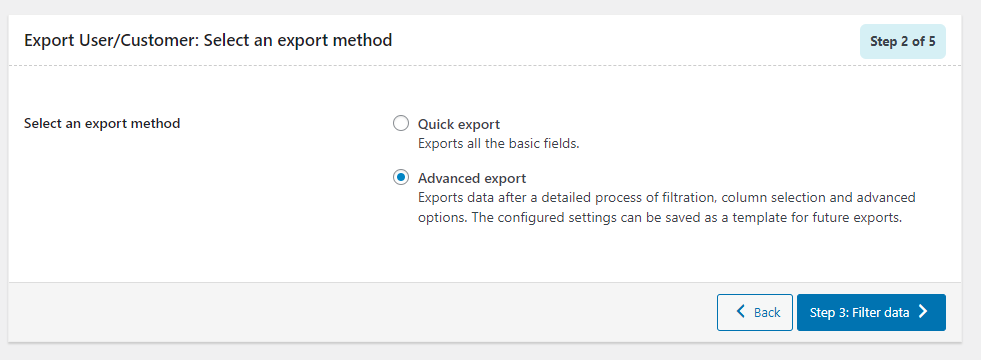
Advanced Export
Advanced export will take you through the entire process of filtering/column selection/advanced options that may be required for your export. You can also save this file for future use.

Now go to the next step Filter data.

User Email – Her you can enter the emails of customers/users to export the data pertaining to them alone.
User roles – Choose or input user roles to export information pertaining to them alone.
Customer Registration – From Date – Choose a specific date to export the customer/user data (who registered) on and after the specified date.
Customer Registration – To Date – Choose a specific date to export customers/user data (who registered) up to the specified date.
Total number of users to export – Enter the total number of users/ customers you wish to export.
Skip first n users – Here you can specify the number of users you wish to skip from the beginning of export. If you entered the total number of users 500 in the above field and are skipping 10 you will be exporting users up to user ID 510 in total.
Sort columns – Sort exported data based on the selected columns in the order specified. It is defaulted to ascending order.
Sort by – It is defaulted to ascending but you can change it to descending as well. It is applicable to the above selected columns.
Proceed to the next step by clicking the button Map and Re-order export columns.

The default export column names can be seen in the above screen. You can edit these if required. If you have chosen a pre-saved template you can see the preferred names and choices that were last saved. You may also drag the columns accordingly to reorder them within the output file.
Now you may go to the Advanced options/batch export window.

Here the following options can be configured:
- Export guest users – Enable to include guest users during export. This feature requires the store settings to allow guest user checkout. Minimal guest user details are fetched from the order details. For these users, the columns like password, username, user created date, etc will be empty.
- Export in batches of – you can give the number of records that the server will process for every iteration within the configured timeout interval. If the export fails you can lower this number accordingly and try again. The default number of records is 0.
- Delimiter – The delimiter allows changing the column separator for columns in the CSV file. Assumes comma by default.
Now if you wish to save the configured settings for export, you can click the Save template button. It opens a popup to add a name for the template.

After naming the template click the Save button. Now the saved template will be visible on the previous templates list for you to choose from.
Was this article helpful?
That’s Great!
Thank you for your feedback
Sorry! We couldn't be helpful
Thank you for your feedback
Feedback sent
We appreciate your effort and will try to fix the article